HTML Forms and User Input - Building Blocks for User Engagement! 🛠️
Hello again web enthusiasts! Today, let′s roll up our sleeves and dive into the practical aspects of HTML forms and user input. Your web page is like a workshop, and HTML forms are the tools that empower users to actively engage with your site. Let′s explore the essential input types and put them into action with a full-fledged example!
Understanding HTML Forms - The Gateway to Interaction
HTML forms serve as the backbone for user interaction on your website. They enable users to submit data, make choices, and actively participate in the web experience. Here′s the basic structure:
<form>
  <!-- Your form elements go here -->
</form>
Obviously you have to know what kind of elements you can insert in your form, let’s find out.
Major Types of Input Elements - Tools in Your Kit
-
Text Input - For Basic Information The
<input>element withtype="text"allows users to input single-line text, like usernames or short answers.<input type="text" name="username" placeholder="Enter your username" /> -
Email Input - Ensuring Correct Format For collecting email addresses, use
<input type="email">to ensure users enter a valid email format.<input type="email" name="userEmail" placeholder="Enter your email" /> -
Password Input - Securing User Secrets When dealing with sensitive information like passwords, use
<input type="password">to obscure the entered text.<input type="password" name="userPassword" placeholder="Enter your password" /> -
Number Input - Ideal for Numeric Data
<input type="number">is perfect for collecting numeric data, like ages or quantities.<input type="number" name="userAge" placeholder="Enter your age" /> -
Telephone Input - Dialing In For capturing phone numbers,
<input type="tel">is designed to accommodate various phone number formats.<input type="tel" name="userPhone" placeholder="Enter your phone number" /> -
Checkboxes and Radio Buttons - Making Choices For multiple choices, checkboxes (
<input type="checkbox">) and radio buttons (<input type="radio">) are your go-to options. The difference between checkboxes and radio buttons is that you can check multiples checkboxes (squared boxes) whereas radio buttons can be grouped together so you can only check one of the declared group. Radio buttons are grouped by using the same name. If you want to check a value by default (whether it’s a checkbox or a radio button), simply add thecheckedattribute.<input type="checkbox" name="interest" value="coding" checked /> Coding <input type="checkbox" name="interest" value="design" /> Design <input type="radio" name="gender" value="male" /> Male <input type="radio" name="gender" value="female" /> Female <input type="radio" name="gender" value="other" /> Other -
Dropdown Menu - Options Galore Use
<select>and<option>for creating dropdown menus. It′s perfect when you want users to pick from a list of choices. By default, the first value will be selected, you can set another value asselectedby default.<select name="options"> <option value="option1">Option 1</option> <option value="option2" selected>Option 2</option> <option value="option3">Option 3</option> </select> -
Textarea - Gathering Longer Text When you need users to provide more extensive responses,
<textarea>is your friend. It′s suitable for comments, feedback, or longer messages.<textarea name="comments" rows="4" cols="50" placeholder="Enter your comments..." ></textarea> -
Submit Input - The Trigger
<input type="submit">element serves as a trigger for form submission. It will appear as a button. Thevalueattribute sets the label for the button, if you don’t set it, the default label is Submit.<input type="submit" value="Send !" />
Creating a Full Form - Your Practical Toolkit in Action
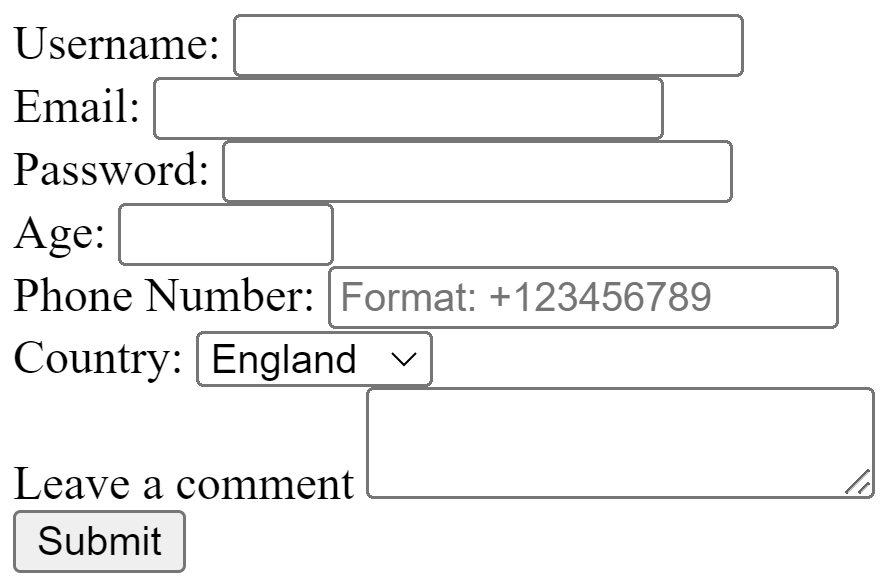
Now, let′s put it all together in a comprehensive form example, including some commonly used input types:
<form action="/process" method="post">
  <div>
    <label for="username">Username:</label>
    <input type="text" id="username" name="username" required />
  </div>

  <div>
    <label for="userEmail">Email:</label>
    <input type="email" id="userEmail" name="userEmail" required />
  </div>

  <div>
    <label for="userPassword">Password:</label>
    <input type="password" id="userPassword" name="userPassword" required />
  </div>

  <div>
    <label for="userAge">Age:</label>
    <input type="number" id="userAge" name="userAge" min="1" max="120" />
  </div>

  <div>
    <label for="userPhone">Phone Number:</label>
    <input
      type="tel"
      id="userPhone"
      name="userPhone"
      placeholder="Format: +123456789"
      required
    />
  </div>

  <div>
    <label for="country">Country:</label>
    <select id="country" name="country">
      <option value="en">England</option>
      <option value="fr">France</option>
      <option value="it">Italy</option>
      <option value="ge">Germany</option>
    </select>
  </div>

  <div>
    <label for="comment">Leave a comment</label>
    <textarea id="comment" name="comment"></textarea>
  </div>

  <input type="submit" value="Submit" />
</form>
You probably noticed a new element: <label>. As it’s name suggests, it will allow you to add a label next to your form element. Even better, you can link a label to a form element by setting the same value for the id attribute of your element and the for attribute of the label. Whenever a user clicks on a label, the focus will be automatically placed on the corresponding form element. It’s good for accessibility.

Behind the Scenes - Processing the Form Data
actionAttribute: Specifies where the form data is sent. It′s typically a server-side script or service that processes the data. As it’s not part of this series, we will not discuss any server-side specifics here, just know that you will need a server to process data sent by the form.methodAttribute: Defines how the form data is sent.postmethod sends the data in the HTTP request body, which is more secure for sensitive information. Again, HTTP requests are not part of this series and will not be discussed here.
Input Validation - Keeping It Real
Use the required attribute to make sure essential fields are filled. Additionally, each input type has built-in validation to ensure the correct format, like email validation for type="email".
<input type="email" name="userEmail" required />
<input type="number" name="userAge" min="1" max="100" />
There are many attributes that can be used to add input validation. You have to keep in mind that this is client-side validation, meaning that anyone can access the HTML code inside the browser, change it for themselves and remove any kind of validation you wanted to enforce. The only way to insure validation is to set it server-side as well (users can’t access the server).
There you have it, a practical toolkit for creating HTML forms with various input types. Feel free to customize and expand based on your specific needs.
Photo of Kelly Sikkema on Unsplash

